Effective Guide: Transfer Procreate To New Ipad
Transferring Procreate to a new iPad is a seamless process that allows you to continue creating art without any interruptions. When upgrading your device, you definitely want to ensure all your Procreate files and settings transfer smoothly to the new iPad. You’ll be relieved to know that the steps to transfer Procreate to a new iPad are straightforward and user-friendly. Let’s dive into how to transfer Procreate to your new iPad effortlessly.

How to Transfer Procreate to New iPad
Introduction
So, you’ve got yourself a brand new iPad and you can’t wait to continue creating amazing art on Procreate. But you might be wondering, how do you transfer all your precious artwork and settings to your new device? Don’t worry, we’ve got you covered! In this detailed guide, we will walk you through the step-by-step process of transferring Procreate to your new iPad so you can pick up right where you left off.
Backing Up Your Procreate Data
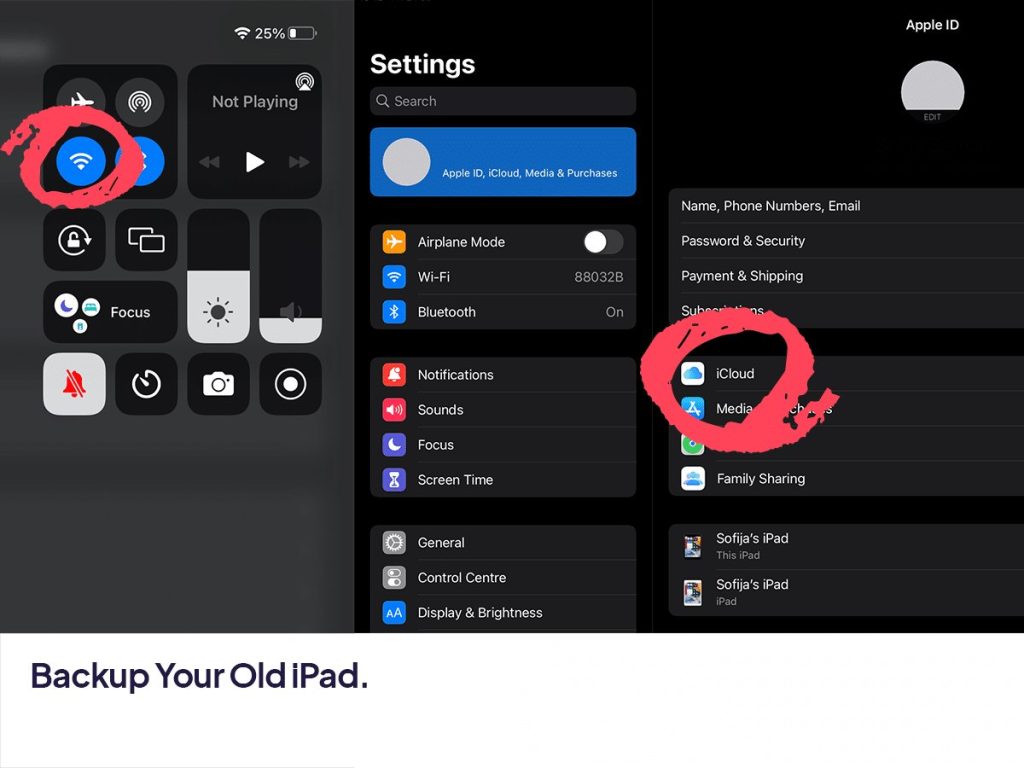
Before we dive into transferring Procreate to your new iPad, it’s crucial to back up all your artwork, custom brushes, and settings to ensure nothing gets lost in the process. Here’s how you can do it:
Step 1: Export Your Artwork
Open Procreate on your current iPad and navigate to the artwork you want to back up. Tap on the artwork and select the Share option. Choose the format in which you want to export your artwork (PNG, JPEG, etc.) and save it to a cloud storage service like iCloud or Dropbox.
Step 2: Export Custom Brushes
If you have any custom brushes in Procreate that you want to transfer, go to the Brushes menu, tap on the brush you want to export, and select Share. Save the brush file to your preferred cloud storage.
Step 3: Export Settings
To back up your Procreate settings, go to the Actions menu (wrench icon), navigate to Preferences, and select Share Settings. Save the settings file to your cloud storage.
Transferring Procreate to Your New iPad
Now that you have successfully backed up all your Procreate data, it’s time to transfer everything to your new iPad. Follow these steps to ensure a seamless transition:
Step 1: Setting Up Your New iPad
Turn on your new iPad and follow the on-screen instructions to set it up. Make sure to connect to a stable Wi-Fi network during the setup process.
Step 2: Download Procreate
Open the App Store on your new iPad and search for Procreate. Download and install the app on your device.
Step 3: Transfer Artwork
Access your cloud storage service on the new iPad and download the artwork files you exported earlier. Once downloaded, open Procreate, tap on the “+” icon, and select Import. Choose the artwork file you want to transfer.
Step 4: Import Custom Brushes
Similarly, download the custom brush files from your cloud storage and import them into Procreate by tapping on the brush icon in the Brushes menu and selecting Import.
Step 5: Restore Settings
To restore your Procreate settings, access the Actions menu, go to Preferences, and select Import Settings. Choose the settings file you saved earlier to apply your custom settings.
Congratulations! You have successfully transferred Procreate to your new iPad without losing any of your precious artwork or settings. Now you can continue creating stunning digital art seamlessly on your new device. Remember, backing up your data regularly is essential to ensure that your creative work is always safe and accessible. Happy creating!
How To Transfer Everything From Your Old iPad to a New iPad Pro, Air, iPad or Mini
Frequently Asked Questions
How do I transfer Procreate to a new iPad?
To transfer Procreate to a new iPad, start by ensuring both the old and new iPads are connected to a stable Wi-Fi network. On the old iPad, open the App Store and go to the “Purchased” section. Locate Procreate from the list of purchased apps and ensure it’s downloaded. On the new iPad, go to the App Store, sign in with the same Apple ID used on the old iPad, and find Procreate. Tap the download icon to install the app on the new device. You may need to enter your Apple ID password to complete the download.
Can I transfer my Procreate files along with the app to the new iPad?
To transfer your Procreate files along with the app, you can use cloud storage services like iCloud, Dropbox, or Google Drive. First, ensure your Procreate files are backed up to one of these services on the old iPad. Once Procreate is installed on the new iPad, log in to the same cloud storage account and download your Procreate files. Alternatively, you can use AirDrop to transfer the files directly from the old iPad to the new one.
What should I do if I encounter issues transferring Procreate to the new iPad?
If you encounter any issues transferring Procreate to the new iPad, make sure both devices are running the latest version of iOS. Restart both iPads and try the transfer process again. If the problem persists, contact Procreate’s customer support for assistance. They may provide specific troubleshooting steps or alternative methods to help you successfully transfer the app to the new iPad.
Final Thoughts
In conclusion, transferring Procreate to a new iPad is a straightforward process. First, ensure both devices are connected to the same iCloud account. Next, download Procreate from the App Store on your new iPad. Finally, open the app and log in to your Procreate account to access all your artwork seamlessly. By following these steps, you can easily transfer Procreate to your new iPad without losing any of your valuable work.